Showing posts with label Crafting. Show all posts

Saturday, April 20, 2013

New Labels!

I love my cougar cutter and vinyl.  See how much of a difference it can make in my kitchen?
Before: boring, blah, not me.
Labels 022
After: Wow, red, me, me, me!
Labels 034
One of the nicest things is you can cut out labels that you can’t buy such as chia seeds or xylitol, etc.  I use Make the Cut software to create the design, send it over to the cutter, and then use transfer vinyl to remove from the mat and apply to the canister.
Here’s the canisters I did today.
Labels 040

Tuesday, April 2, 2013

Make your own Soap Pump

I do not like those little soap pumps I keep beside the kitchen and bathroom sink.  To refill them is a nightmare with soap flowing all over the place, the hole is much too small.  I came across this idea on Pinterest and thought "wonderful!"  I made one last night.  A standard canning jar with a hole in the lid (I used a Dremmel to cut the hole), super heavy duty glue (I used Gorilla Glue), I think the pump part came from a Costco Kirkland shampoo bottle I've had it for ages, let it dry overnight.  Fill up your canning jar with soap and put the lid on, you can glue the two piece ring but I didn't.  I cut the vinyl letters out with my cougar cutter.  Someone suggested spraying the ring with a clear coat sealer to keep it from rusting but I didn't have any.
The original idea came from here: http://www.goodgirlstyle.com/2013/01/weeknight-project-mason-jar-soap-pump.html

Hand soap pump jar

Monday, March 18, 2013

Homemade Chapstick

Today I made 41 tubes of chapstick, about 20 cherry and 21 cinnamon flavoured.  The recipe I used was okay but I think I'll keep looking for a better one.  
Here's the mix I used:
4 tablespoons coconut oil
2 tablespoons beeswax (rough estimate: about 25 grams, melted and strained)
1 tablespoon raw honey
essential oil (I used cherry and cinnamon)
I found I needed to keep everything pretty darn hot and keep stirring or it would separate and not set in the tubes very well.
Live and learn. :)
Homemade Chapstick

Saturday, February 16, 2013

Wednesday, February 13, 2013

My Cup and "Posts" Blogging App

I posted this yesterday on Facebook but in case you steer clear of FB I thought I'd post it here as well.  Well that's one reason, the other is I'm trying out "Posts" by Pico to see if I like it for posting to my blog from my iPad 3. I ordered a Bluetooth keyboard because I really like using my iPad but don't like the onscreen keyboard, it should be in pretty quick.  I also tried out Blogsy by Fomola but so far am not impressed with that app at all.  It's a shame Windows Live Writer by Microsoft doesn't come out with an iOS app (Who am I kidding?  Like THAT'S ever gonna happen! Lol)

Okay now that we've had a good laugh here's the reason for my post.  Sydney and I have identical cups and are always getting them mixed up.  I saw this idea on Pinterest and loved it!  I don't think the ink will last for a loooong time but it's holding up extremely well.  Now Sydney has no reason to use my cup!

Tuesday, February 12, 2013

Birdseed Wreath


I made a birdseed wreath. It was pretty simple and you can get the recipe here: http://www.infarrantlycreative.net/2012/03/birdseed-wreath.html

 Or here's the list of ingredients but I used whole wheat flour and had to add a touch more water
1 envelope Knox gelatin
1/2 cup warm water
3/4 cup flour (I used whole wheat but had to add extra water)
3 tablespoons light corn syrup

4 cups wild bird seed

bundt pan
nonstick spray
Whisk gelatin and warm water in a bowl. Add flour and corn syrup. Add birdseed and stir with a wooden spoon. Spoon mixture into greased bundt pan and press down. I first used a small measuring cup to pat it down quite tightly and then wet hands for the final press.

Let it harden for a few hours. Pop out of the pan and let the other side harden. Hang it up using string or ribbon and watch the birds.

Do not hang it where it will get rained on!


Here's the finished wreath
Birdseed wreath
I'm sure the birds are going to love it!
Drying in the bundt pan
Drying the other side
The next one I make I think I will use wire to create a circle smaller than the pan.   Add half your birdseed and lay the wire down with the ends sticking out the top.  Add the rest of the bird seed.  When it dries you would have a built in hook for the string to loop through.  I'll add to the post when I find out which child took my wire and where they took it!

Edit:  I finally snapped a picture of a bird eating the wreath!
Bird Wreath

Friday, February 11, 2011

Cricut Valentine Card

Using my Cricut Expression I made Valentine cards for Jevan to give out to his class.  They are based on this pattern if you’d like to make them.

Cricut Valentine Cards

I’ve created a Facebook Photography page on Facebook and if you’d like to join please click the icon on the right side of my blog, Facebook will open and then click “Like” while there.  I find I’m putting pictures up at Facebook and Flickr before I get to my blog so if you’d like to see them earlier please join me at Facebook. :)  I’m running a contest for a free print, get the details at http://www.facebook.com/Lillooet

For lots more pictures visit my flickr site:
Kansas A 


Flickr

***************************

Monday, January 25, 2010

Make your own Cricut George cartridge for free!

Most Cricuts come with the George and Basic Shapes cartridge, unfortunately mine did not.  I have no idea why, maybe because I bought my Cricut in Canada?  I quickly found out that a lot of free patterns found online are created with the George cartridge, probably because most people have it.  Since you can’t buy George, other than on eBay for a ridiculous price (around $50 and up!), I decided to make my own.
It’s really quite simple, especially for a person who crafts. ;)
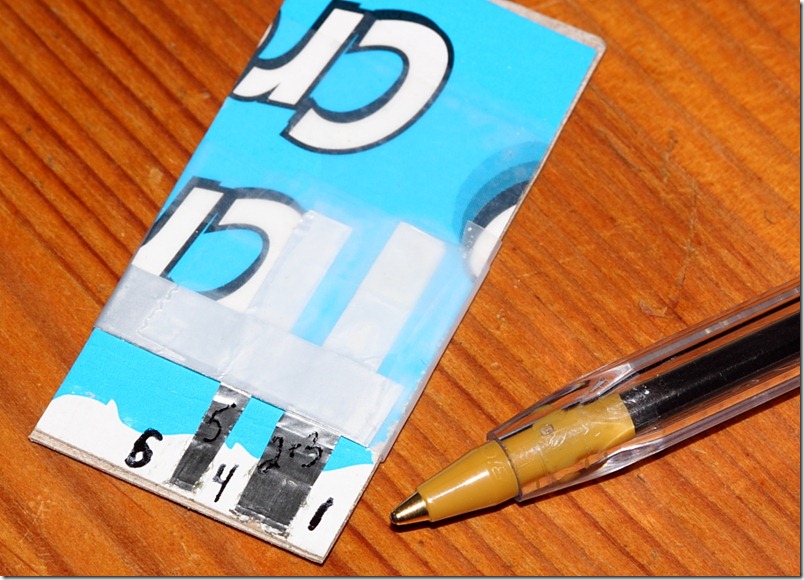
I used two pieces of cardboard from a potato chip box because it makes it thicker to fit into the slot.  One inch wide by about 2 inches long.  At a forum I belong to someone said you could also use an old credit card because it’s thicker, I haven’t tried that method but it sounds good.
I then cut three pieces of tinfoil.  It doesn't matter about the size of the piece that goes across the two strips, you're only using it to connect the strips together so everything touches.  You may have to double the two tinfoil strips (or even triple it) to make them slightly thicker so they can touch the pins in the Cricut, simply fold them in half, but do not put them on the backside of the cardboard.  One strip will cover pins 2 & 3 together, and the other strip will cover pin 5.  Make sure the tinfoil for pins 2 & 3 are a tad wider than the strip for pin 5.  You can see in the picture where I've marked the pins.
Tape the two pieces of cardboard together and then glue down the tinfoil.  Tape the top tinfoil that goes across the two strips so all three pieces of tinfoil connect.  In the picture my George has been used quite a bit but is still working great. :)
George 021
This is what your George cartridge looks like when it’s in the Cricut.  Make sure it lines up correctly and it has to be facing towards you.
George Cart 008
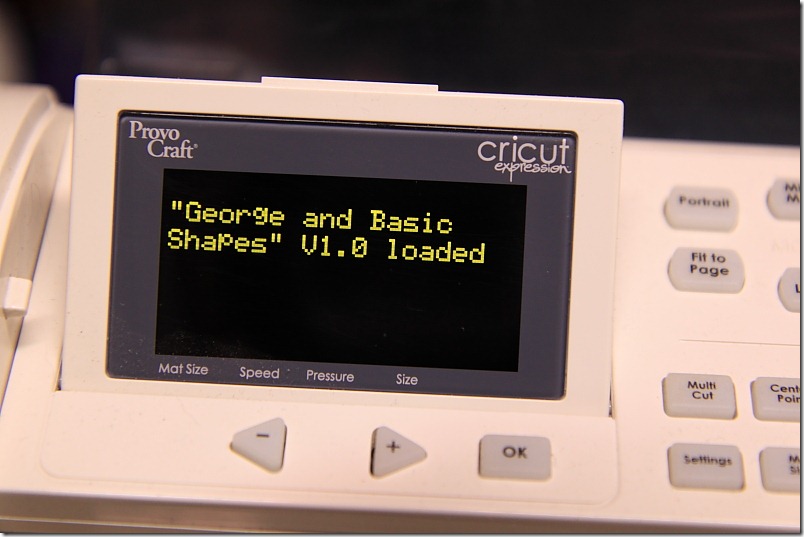
Here you can see on the screen that George is loaded.
George Cart 011
And here’s a close-up.
George Cart 009
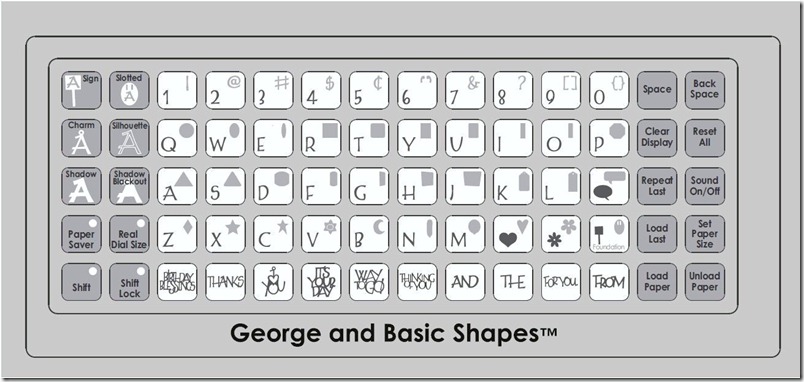
Print out of George.  If you click on the picture you will go to flickr.  Select “All sizes” and download the original size for a bigger image.  If you Google “George Cricut Handbook” you’ll come up with quite a few results.
George and Basic Shapes
If this worked for you please leave a comment and let others know it really works! :)
Disclaimer:  You do this at your own risk!  One person (out of hundreds) reported that her Cricut will only recognize the George cartridge, it’s possible that this problem could have happened even with the original George cartridge but I thought I’d let everyone know.
For more pictures please visit my Flickr site. http://www.flickr.com/photos/kansasa/
If you really don’t want to make your own, and would like a heavy duty one, James has left a comment that I thought I would share on this post.  Thank you James! :)
James has left a new comment:
My friend showed me your site and since my Wife received a Cricut Expression for Christmas (from me), and we didn't get that cartridge I thought that's a great idea!
I designed a very simple electronic board, to make it easier to use. Also should you ever have a case with a bad board inside it should fit perfectly in the case. I appreciate you sharing the idea with the world so I'm also sharing the electronic version without any charge for my time, although the service has a fee. The cost is $5.35 each with $11+ Shipping and Handling, actual shipping time was 3 weeks because they are made to order. I suggest several friends buying as a group to share the shipping and handling. I bought 1 for myself and 2 for friends for a total of $27. It doesn't have a label but this is a crafty audience who could do a better job themselves.
http://batchpcb.com/index.php/Products/27193
******************************************************************

Saturday, December 12, 2009

Christmas Mug Pouch

Okay I “scraplifted” this from another site, the The Frugal Crafter, and I have to say she has some excellent stuff over there! :)  Yup I’m learning the lingo as I carry on with my Cricut. LOL  I actually just grabbed the freely available .svg file and then sized it, cut it, and decorated it to my liking.
Cricut Mug for Xmas
When I get to the grocery store I’ll pick up some cinnamon sticks to stick in with the apple cider.  I’m thinking of getting some hot chocolate pouches and maybe a candy cane too.
I’ve uploaded the scut file (works with Sure Cuts A Lot Version 2 or SCAL for short) here.  Two mugs will be cut on one sheet of 12x12 paper.
This design cuts as one piece but I found it not quite sturdy enough and I also didn’t like the back of the Christmas tree paper, so I “flipped” the design and cut another set to paste together.  If you only want to make one mug then flip the bottom one on the scut file before cutting, or delete it if you want to use different paper.  I then used the Cuttlebug to emboss the back and handle.  Fold the front over and glue.  I tied a ribbon onto the handle and I also glued ribbons on other ones I made.
I like this design for not only Christmas, but “Tea for Two” with two teabags inside, or if someone has a cold/flu a pouch of Neo Citron with “Get Well Soon” or a “Cup a Soup” pouch… the ideas are endless! :)

Friday, December 11, 2009

Simple & Quick Santa Ornaments

Last night I created a four page SCAL (Sure Cuts a Lot) file to make it really simple and quick to cut out Santa Ornaments, you’ll do four at a time!  Today I cut everything out and put them together.
Santa Christmas Ornaments
I didn't have the cartridges from Provocraft so I had to improvise in SCAL :)
Download the file by clicking here.  I created it using SCAL Version 2.0.
Supplies:
White glitter paper (I used one 12x12 sheet from Martha Stewart’s Holidays Multimedia Pad to make eight Santa Ornaments) Cut using MAX pressure!
Red paper for hat and nose
Cream paper for face
4 background circles 4 inches
4 smaller circles 3.5 inches  (Can be all the same or mix and match)
Glue/adhesive
Pink ink for cheeks (I used a small make-up sponge and mixed red and white together)
Black fine tip marker for eyes
Pop up dots
Ribbon
Cut everything out.  You’ll do four at a time.  Run the 4 inch background circles through the Cuttlebug.  Glue the cream face behind the Santa beard with the top sticking above.  Glue the white band and pompom to the hat.  Glue the red nose to the moustache.  Set all that aside to dry.
Cut your ribbon, about 5-6 inches.  Glue to background circle.  Glue the smaller circle so the ribbon is sandwiched between.
Apply pinkish cheeks to Santa’s face.  Glue all the parts from Santa together.  When applying the moustache I glued only the nose so the ends of the moustache would stick up a bit.  Use a fine tip black marker to make Santa’s eyes.  Apply two pop up dots to the back of the Santa and place on the circles.
Santa Christmas Ornament
At first I was using a punch to create a hole in the top before gluing the ribbon in behind.
Santa Christmas Ornament
The pop up dots made Santa stand out.
Santa Christmas Ornament

Thanks to Shari over at Flickr for the idea!

Thursday, December 10, 2009

Cricut Cards & Looming Xmas Gifts

I’ve finally figured out where the Cricut cuts and it’s opened a whole new world for me ;)  And having SCAL (Sure Cuts A Lot program) helps too. 

Here’s a few Christmas cards as well as Pop’s birthday card, he turns 69 tomorrow.  We are heading over there for a fondue dinner but I think we’ll all snack before we go because don’t ya find yourself hungry after doing fondue?  My idea of a fondue is to use the basket from my deep fryer, those piddly little forks with teeny chunks of meat just don’t feed my logger :)

The tree on the first card was a svg file from Free Svg’s blog.  I guess I’m an “earthy” kind a gal ‘cause I really like the colours… it’s about time eh?  Maybe I can figure out this colour coordination thing after all, I was beginning to think a person has to be born with the skill ;)  The other two Christmas cards were placed in the Cricut so the design on the paper was in the right spot, then some embellishments added to compliment.

 Christmas-Cards-Gifts-009[8]

I dug out my looms and, boy oh boy, were they dusty!  It’s been awhile since I’ve loomed but I find it’s like riding a bike; you don’t forget much.  I whipped up two hats in short order, the blue one using Isela’s small gauge loom and the white one using the green round loom from Knifty Knitters.  While digging for wool I found a scarf that I started on needles last year, and only needed to bind it off, so it’s been added to this year’s Christmas collection too.

Christmas-Cards-Gifts-012

Friday, December 4, 2009

Love Hate with the Cricut

I’m liking this Windows Live writer, it’s making me post more :)  … the card making with my new Cricut?… not so much.  I know for next year to start my cards in January because I spend waaaay too much time on a single card.  I’ve come to conclude there is no such thing as “quick and simple” when paper, glue, and scissors are involved.  Did I just say that?  Jevan has been learning paper, glue, and scissors for the last two years in school and me, at my age, is cursing it!  Maybe I should pop into his kindergarten/grade 1 class for a few hours?  I promise to leave my pointy scissors at home :)

Sydney, on the other hand, is loving the Cricut.  She will sit there for hours using all my specialty paper, my new glue adhesive, my new pop dots, etc., etc.  It got to the point when I had to tell her to start using scraps or I wasn’t going to have anything bigger than a 5x7 left!  Lately she’s been making mini paper dolls to take to school.  Really cute and fancy… okay she didn’t inherit those skills from me, but her Dad is really good with a chainsaw so maybe she got the creativeness from him?

I try, really I do, colour coordination is my downfall, but give me a sewing machine, or let me set up a computer for you, or asked me to make yorkshires, or, or… Anyhoo, here’s my latest creation, take your glasses off. ;)

Snowman Card 012

When I was in Kamloops I popped into Michaels (I really think they should rename it “Costco for Crafters” ‘cause ya go in for ONE thing and come out with a bundle!).  Along with my bundle I bought a couple of 6x12 inch mats for the Cricut.  Did you know that 6x12 inch mats don’t work in the Cricut Expression?  Well now you know.  Funny how, in all my research, I didn’t read that little tidbit of info anywhere, and believe me I’ve been to tons of sites!  I ended up cutting the ends off and using them sideways, seems to work, but only for small stuff.  I would have bought the 12x12 mats but for some reason I cannot find them in Michaels (twice I’ve looked and the sales person at the till was no help).  They have the 12x24’s but not even a space for the 12x12’s, I find it odd that they don’t sell them.  Wal-Mart has a space for them but of course they are long sold out :(

Wednesday, December 2, 2009

Another trip to Kamloops

As you’re reading this I’m on my way to Kamloops and I was just there one week ago.  I have to say the stores were great last week… no crowds, no line-ups at the till, lots of parking for my 4x4 long box truck (amazing!) but I have a feeling that’s not going to be the case today.  It’s Dec 2 and that, my friends, is just getting too darn close to Christmas.

The reason I went last week was because I had my eye on a new machine called a Cricut, made by Provocraft, a couple quick calls and I found out that Wal-Mart had them in stock, with a hundred dollar rollback, Michaels was 200 dollars more!.  This thing is pretty cool and if you’re crafty you can make a ton of things.  Okay the name of my blog is “Canadian Crafter” but I craft in different ways; knitting, looming, embroidering, etc.  As for making cards and such, I suck… big time.  My problem is I can follow a pattern but coming up with ideas on my own I find really tough.  I wish I could buy a bottle of “how to make cards and scrapbooks look pretty using your own ideas” because I swear some of the designs I’ve seen I wonder how on earth these people come up with them!

After making a few cards I have truly learned that when I see the humble little card in someone’s showcase I will gush and gosh over it as much as the elaborate ones because that card took as much thought, and time, as any other one.  I tried last night to make a card similar to one I saw at another blog… she quotes “This is a quick and simple design if you are wanting to make a quantity of holiday cards.”  Uh?… “quick and simple”? it just may be if you have creative juices flowing from your brain to your fingers because it took me about an hour and my card did not look like hers at all!  I’ve never before used some of the craft products that I bought when I was in Kamloops, but after getting sticky adhesive on the front of the card (look near the dot above the j) and then using my finger to try to remove it, leaving a dirt mark on the front that would not come off… well you get the picture… another card for a family member who wears thick glasses or perhaps needs glasses. ;)

But I will not give up, darn it!  Today I will buy baby wipes to keep beside my craft table and use them often.  Maybe I can find a full bottle of creative juices while I’m there too? ;)

Cricut Cards 010

Tuesday, March 25, 2008

Lunch Bag CD/DVD Holders

Quite sometime ago I remembered reading on Tipnut.com about using paper lunch bags to hold cds and dvds. For someone who gives away quite a few dvd's I thought this was a wonderful idea. It's also a great protector for stray cd's in the car. When I was in Kamloops I was browsing Wal-Mart and bought a fifty pack of lunch bags for $1.78. At the same time I also checked out cd sleeves, they were $3.97 for a 60 pack, quite a difference!

These are a breeze to make. The blog, Empty House, suggests cutting off about 1 1/2 inches across the top but I found I had to cut off just over 3 inches to make it work. The top then tucks into the flap on the bottom.


In reading the comments someone had suggested taping down the "backside," because the DVD/CD will only fit one way. I used two small pieces of tape and it worked great.


You can colour, stamp, or print and glue a label on them. Great idea! Thanks Tipnut.com and Empty House!

Sunday, December 30, 2007

What to do with those leftover Xmas Cards

"Think outside the box." Or just think "of a box." It's pretty simple to make small boxes from old Christmas cards.

Take one used Christmas card. (Thank you Isolde for the card, and a Merry Christmas to you too!)


Cut it on the crease:


Fold the picture side (this will be the top of your box) in half, but only pinch it on the end where the arrow indicates, do not crease it all the way down.


Open the card and put a small mark where you pinched it.


Fold it lengthwise and do the same thing:


You should have all four sides marked:


Fold up to exactly your pen marks and crease, I used a sharpie to really push it down. Fold, crease, and open all four sides.


Cut from the edges where arrows indicate:

Fold sides in:


Tape or glue flaps:


You want the bottom of the box slightly smaller so the top will fit over it. You'll do the bottom almost exactly the same as the top except you want to make your folds slightly over your pen marks:


Tada! A box:


If you want your box to look not so creased and a bit more professional then I suggest measuring instead of pinching the folds. You could make a stack of these boxes and give them to the kids or you can fill them up with small Christmas gifts for next year :) Have fun!

Thursday, December 13, 2007

Quickie Crafts

These don't take to long to make, and we are down for the count, Christmas is almost here! Here's a couple of tutorials for some simple and quick crafts.

Charms turned into fridge magnets:


Remember the thumbtacks I made? Well I couldn't find small cork boards to use them with so I made my own. This is a 6x6 inch square.


Here's how simple the charm magnets are to make. For the cork board tutorial scroll farther down.

I bought 3/4 inch magnets at Michaels. This is a 50 pack.


Here's two packages of charms:


Flip them over and peel the sticky off the back:


Use a scraper or what have you to get the second peel off:


Glue one 3/4 inch button magnet onto the back using a hot glue gun.


Done :)


And now for the cork boards, and they are magnets too. They came with stickies to mount them to a wall but I wanted them on a fridge or school locker and NOT permanent so I came up with this idea.

One tile is just a bit too thin for thumbtacks so you'll need two squares to make one cork board.


Because I was using 3/4 inch magnets I took a 3/4 inch drill bit and oh so gently made a 3/4 inch hole in each corner of ONE tile. I used an old cutting board to drill into. Stop when you just break through and you then can break off the inside with your fingers what small amount is left. If you drill right through you risk breaking the corner.


The drill makes a nice even hole. I'm sure you can use an exacto knife if you don't have a drill.


Make sure your magnet fits.


First glue the two tiles together without the magnets in place, ensuring all around the edges are glued. Then glue the magnet in place.


The magnet should sit flush.


There you have it; a cork board that you can tack notes to which is a magnet that sticks to your fridge!

The magnets come in 50 packs and I have a lot left, so I found two pins that I no longer have the backs to. I bent off the pins, hammered flat what little was still left, and glued a magnet onto each of them. I have no idea where the Winnipeg Jets pin came from but, heck, it holds papers on my fridge now :)


My Dad was Deputy Chief of the Lillooet Volunteer Fire Department for over 20 years so I have a few of these pins around :)


I hope you all can use this information to whip up some last minute "quickie" gifts! I've got to get back to sewing now :) My Google reader has now reached over 200 blogs not read and I just can't keep up, so please forgive me for not leaving comments at this time. Hopefully things will settle down after Christmas!