I was going through some older posts and noticed most of my photos/images are gone. I guess when Google Docs did something it broke the link, yet when I go to Google Docs all the photos are there. It would be a huge job to get all the photos back so I’m going to skip that unless I really need to show something. It’s frustrating because I used Google Docs for quite awhile before switching over to Windows Live Writer, and now I hear they are doing away with that too. I’ve googled the heck out of this and can’t really find much info about it, gosh you would think more than me would have this problem?? I was hoping for a quick fix but no luck, hopefully I find something.

Showing posts with label Technical. Show all posts
Showing posts with label Technical. Show all posts
Thursday, July 25, 2013


Friday, February 15, 2013
Logitech Fold-up Bluetooth Keyboard for iPad
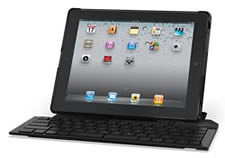 I had an accupuncture appointment in town yesterday and stopped to check the mail. My new keyboard for my iPad 3 was in! Oh the excitement! After finishing everything in town I raced home only to be very disappointed.
Oh it works but here's a list of disappointments:
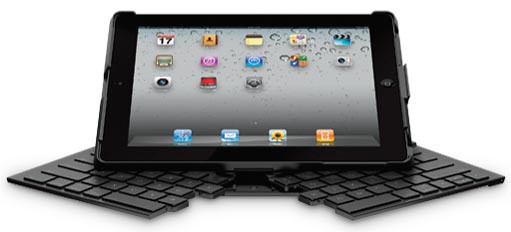
It's an extremely tight fit and you have to snap it in there pretty tight, doesn't make it easy to pull off and on.
The clear plastic cover surrounding the keys left an awful sticky mess behind, like it was heated up and had been on for a very long time.
The split space bar is really horrible! One wants to click right where the space is so it will not work and you often end up with no space between words. You end up having to hit the delete key to backspace a LOT.
The overall cheap plastic feeling of the keyboard, like it's not going to stand up to everyday use.
I have the Apple Smart Cover they say works great with it... um no. You can't fold it up when you have the keyboard attached at all. All it does is hang off the back, and you can close it but that's it. If you want to actually use it the way it was intended you would have remove your ipad from the keyboard.
So far everytime I go to use the keyboard it needs to be reconnected in my settings, for some reason the bluetooth won't stay connected.
The bulk of the keyboard is bad. If you think this thing will only add a few millimetres you would be totally wrong, it's thick!
Oh I will probably get used to using it, it will take awhile though. I do like that it is larger than some of the keyboards I looked at, I mean what's the point in getting an external keyboard if you still have to use two fingers to work it? I do like that it is charged via usb and supposedly the charge will last about six months. Another reason for liking it is if you have crappy eyes due to aging but your fingers know where the keys are you can sit in your dark kitchen, early morning, and type up a blog post. Just be prepared to hit the delete key often because of the spacebar issue.
Friday, March 5, 2010
Blogger is broken
Grrrrh! It’s going on the second day where I can’t get into my own blog, nor any blog with “blogspot” in the address. It seems it’s Telus blaming Blogger, Blogger blaming Telus, and even the satellite company Xplornet involved. Although my ISP isn’t Telus, Lyttonet leases all their lines from Telus. It does appear most of the people effected are in BC with a few from Alberta.
Lack of information is frustrating and hopefully they will get it worked out today. Right now I’m using a proxy to access comments but it’s a real pain in the butt.
If you’re having this problem there is a long thread started over in Google, please add your ISP and location to it so someone can figure out this mess. Some people are able to get into blogger for a short time and then not, so the problem is intermittent for some, I haven't at all since Wednesday night.
http://www.google.com/support/forum/p/blogger/thread?tid=6f168fe42f342c61&hl=en&fid=6f168fe42f342c6100048105e3ceb12a
I just tried to publish this post using Windows Live Writer and was denied access so I’ll try the proxy and see if that works, fingers crossed!
Lack of information is frustrating and hopefully they will get it worked out today. Right now I’m using a proxy to access comments but it’s a real pain in the butt.
If you’re having this problem there is a long thread started over in Google, please add your ISP and location to it so someone can figure out this mess. Some people are able to get into blogger for a short time and then not, so the problem is intermittent for some, I haven't at all since Wednesday night.
http://www.google.com/support/forum/p/blogger/thread?tid=6f168fe42f342c61&hl=en&fid=6f168fe42f342c6100048105e3ceb12a
I just tried to publish this post using Windows Live Writer and was denied access so I’ll try the proxy and see if that works, fingers crossed!
Friday, November 21, 2008
Power Problem... again.
Our power went out but I think you gathered that, and it's still out. Hydro first said it would be restored at approximately 5:30 PM, now they say 7:00, and you can bet your bottom dollar that will change to 11:00 when I call again. You know one wonders why oh why we don't have plans in place before something happens?? I seriously did not marry a boy scout. I knew there was no way I would be able to lift the power plant into the truck and drive it over to the house but the thought of having no power into the night was enough of an incentive to get me dragging the thing. I seriously think we should build a box beside the house to hold it, along with the two new extension cords I intend to buy, because if I have to do that every time our power goes out I'm going to have a heart attack!
The UPS is a rather handy gadget. Today I was in the middle of computing and our power sort of flicked off and on, nothing skipped a beat. Now we are totally without power and my server with attached port replicator has kept right up. I also have a router and external dvd burner plugged into it. I run the software off of my server, it's called Grid Junction, an excellent program for it, much better than what comes with it. If the power dies on the supply it will gracefully shut down the server, a pretty handy feature. It also keeps track of all the events, and lets you know how much time you have. Oh did I mention the program is free? That's really nice too :) The UPS isn't just for a server, it would work great for a computer and monitor too.
So now I have the UPS plugged into one of the extension cords coming into the house from the power plant. Hopefully we don't run out of gas, but if we do at least the UPS is charging!
It sure would be nice to have one large enough to run my stove, because the way the wind's howling there is no way I'm firing up the barbecue!
Sunday, November 16, 2008
My, how things change
You all remember awhile ago how I was cursing iTunes? How I said "brain surgery" would be easier? Well, well... how things have changed! I had bought an iPod touch quite sometime ago and that's when I really had to start using iTunes. I don't know why Apple doesn't just allow you to drag & drop files but for some reason they don't. Anyhoo, I, of course, was one who "jailbroke" my touch, I mean it really didn't have a whole lot you could do with it unless it was jailbroken. Apple put very little programs on it, and after a week one gets terribly bored, well I do anyway :) I'm a "gadget" girl, I like to see and add as many things as I can get my hands on when it comes to "gadgets." I had the "Aqwoah Battery" icons, and the "Amaze!" labyrinth game, along with a ton of other apps, I had played with it until I couldn't play with it anymore... or so I thought.
For the most part, and the novelty was starting to wear down, I used my iPod when I went to town and didn't want to pack my laptop. It's great for when you're sitting in the truck waiting, you can always "play" with your iPod, and it's not just for music anymore :)
Then I heard about the new 2.0 version Apple was selling, (yes selling!) for the touch. I was a bit disappointed with that, as my iPod is less than six months old, and it really should be a free upgrade, or at least a discount. Even though it's only 10 bucks I held off buying it, it was just a matter of principal. But now it's at version 2.1, and the apps store was sounding pretty interesting... The pressure was really building for me, especially since I just took an old modded Xbox and turned it into our home theatre system and Xbox Media center remote is offered on the iPod touch.... yes the excuses were getting long for why I should upgrade.
Yesterday I broke down and formatted my iPod, paid for and installed version 2.1, and now I can't stay out of the apps store!! Even the freebies apps are great! There's apps for everyone out there, from knitters (StitchMinder) to bowlers (Flick Bowling), I'm so impressed... well at least for a little while anyway ;)
For the most part, and the novelty was starting to wear down, I used my iPod when I went to town and didn't want to pack my laptop. It's great for when you're sitting in the truck waiting, you can always "play" with your iPod, and it's not just for music anymore :)
Then I heard about the new 2.0 version Apple was selling, (yes selling!) for the touch. I was a bit disappointed with that, as my iPod is less than six months old, and it really should be a free upgrade, or at least a discount. Even though it's only 10 bucks I held off buying it, it was just a matter of principal. But now it's at version 2.1, and the apps store was sounding pretty interesting... The pressure was really building for me, especially since I just took an old modded Xbox and turned it into our home theatre system and Xbox Media center remote is offered on the iPod touch.... yes the excuses were getting long for why I should upgrade.
Yesterday I broke down and formatted my iPod, paid for and installed version 2.1, and now I can't stay out of the apps store!! Even the freebies apps are great! There's apps for everyone out there, from knitters (StitchMinder) to bowlers (Flick Bowling), I'm so impressed... well at least for a little while anyway ;)
Wednesday, October 1, 2008
Electronic Buzz
This past week I have been up to my ears in solder, thermal paste, and screws! I ordered a larger cpu for my HP Mediasmart server and that was the first thing I swapped out this week. It's not easy to rip apart but everything went pretty smooth. I really should have done it when I upgraded the ram but I was too chicken then ;) The baby now smokes along at a good speed and the heat is minimal.
Next up was Sydney's laptop. I bought arctic silver thermal paste for my server cpu and thought it might help with the heating problem of the laptop. It's a big job ripping that baby apart and I wanted no distractions. I waited until the kids left for school and got at 'er. After filling up the kitchen table with parts and pieces I managed to get to the cpu. What a mess! The original paste was dried up, caked on, and generally worn out. I used alcohol to clean the cpu and heatsink and applied a small amount of the new paste. I cleaned up the fans, adding a small drop of oil on both of them. A can of compressed air cleaned up the dust, and a good general cleanup, and I was ready to put it back together. As I got to the speakers I decided to baffle them to help with the tinny sound, so I cut up some gauze and taped them behind the speakers. I got the whole works back together and, darnit all, one speaker didn't work. That one speaker has been a pain ever since the first time I took it apart.... sooooo I took it apart again. Mickey moused the speaker connection and wala it works! Sound good too :) The laptop does feel much cooler and I highly recommend the arctic silver. Heat is the worst thing for computers. I don't know how people can cram their towers into those little cubby holes in their desks, (and they are always near the floor,) and then expect the computer to not overheat?? The computer acts like a mini vacuum cleaner sucking in all the dust and debris from that level, it's even worse when there's carpet! The dust acts like insulation making more heat so even if you can't rip a computer down to the cpu you can blow it out with compressed air and place it somewhere where there is lots of circulation. I blow my laptop out at least once a week, especially because I have waaaaay too many dogs in this house that shed, and shed, and shed.
Okay I'll stop ranting ;)
Finally the last thing on my electronic list is the kid's Wii... and it's not been going well :( I bought a mod chip for playing backed up games. Yes I know it's illegal to download games and burn them if you don't own them, and because I'm on a satellite connection there's not any chance I will be downloading games. I strictly want this for backing up the games we already own. I've already had to replace three games due to scratches and at 60ish dollars a piece it's getting expensive. So I get the Wii ripped down, solder the chip into place, put the thing back together. Doesn't work. Rip it apart again, check to see the led light is green on the chip, yup it's on, the Wii still plays purchased games, just not the ripped ones. Bad chip? Bad soldering? I've checked every connection with the multimeter and everything's good so I can't figure it out. Could be I need to get different disks. I'll keep working it on it but I'm about ready to fork out the money to buy one already modded.
Update: WOOOOOOOHOOOOOOO! It was the burn!!! For some reason my laptop didn't do a good burn... on about 6 different disks. I hooked up my external BenQ drive, which is old as the hills, and it worked! You want to see a happy person just look at me :) :) :) So far I've burned two games and they work great, the originals are stored safely in a drawer to stay scratch free forever :)
As well as doing all the electronic stuff, Hubby and I cleaned out the chicken coop. We did a major this time, including building a new roost. I picked up 15 new chickens and they even laid four eggs in the cage by the time I got home. I've been getting about 15-16 eggs per day out of the coop now, much better than what I was getting.
The brown one is quite young and the other one is about two.

Out of the 15, 10 are fairly young and 5 are older. Here's one of the older ones.

Making themselves at home.

I drove down to Hope and met a guy there to get the chickens. If you've never seen Hell's Gate I snapped a picture of it.

Along the way there's a few tunnels one goes through. I wish they'd put a tunnel in at the Big Slide, sigh....
 Hubby bringing in wood for winter.

The pool is put away, the garden is overrun with weeds (but that's typical on any day), the coop is clean, and our deck is filled with wood... c'mon winter I'm ready for you now.
Next up was Sydney's laptop. I bought arctic silver thermal paste for my server cpu and thought it might help with the heating problem of the laptop. It's a big job ripping that baby apart and I wanted no distractions. I waited until the kids left for school and got at 'er. After filling up the kitchen table with parts and pieces I managed to get to the cpu. What a mess! The original paste was dried up, caked on, and generally worn out. I used alcohol to clean the cpu and heatsink and applied a small amount of the new paste. I cleaned up the fans, adding a small drop of oil on both of them. A can of compressed air cleaned up the dust, and a good general cleanup, and I was ready to put it back together. As I got to the speakers I decided to baffle them to help with the tinny sound, so I cut up some gauze and taped them behind the speakers. I got the whole works back together and, darnit all, one speaker didn't work. That one speaker has been a pain ever since the first time I took it apart.... sooooo I took it apart again. Mickey moused the speaker connection and wala it works! Sound good too :) The laptop does feel much cooler and I highly recommend the arctic silver. Heat is the worst thing for computers. I don't know how people can cram their towers into those little cubby holes in their desks, (and they are always near the floor,) and then expect the computer to not overheat?? The computer acts like a mini vacuum cleaner sucking in all the dust and debris from that level, it's even worse when there's carpet! The dust acts like insulation making more heat so even if you can't rip a computer down to the cpu you can blow it out with compressed air and place it somewhere where there is lots of circulation. I blow my laptop out at least once a week, especially because I have waaaaay too many dogs in this house that shed, and shed, and shed.
Okay I'll stop ranting ;)
Finally the last thing on my electronic list is the kid's Wii... and it's not been going well :( I bought a mod chip for playing backed up games. Yes I know it's illegal to download games and burn them if you don't own them, and because I'm on a satellite connection there's not any chance I will be downloading games. I strictly want this for backing up the games we already own. I've already had to replace three games due to scratches and at 60ish dollars a piece it's getting expensive. So I get the Wii ripped down, solder the chip into place, put the thing back together. Doesn't work. Rip it apart again, check to see the led light is green on the chip, yup it's on, the Wii still plays purchased games, just not the ripped ones. Bad chip? Bad soldering? I've checked every connection with the multimeter and everything's good so I can't figure it out. Could be I need to get different disks. I'll keep working it on it but I'm about ready to fork out the money to buy one already modded.
Update: WOOOOOOOHOOOOOOO! It was the burn!!! For some reason my laptop didn't do a good burn... on about 6 different disks. I hooked up my external BenQ drive, which is old as the hills, and it worked! You want to see a happy person just look at me :) :) :) So far I've burned two games and they work great, the originals are stored safely in a drawer to stay scratch free forever :)
As well as doing all the electronic stuff, Hubby and I cleaned out the chicken coop. We did a major this time, including building a new roost. I picked up 15 new chickens and they even laid four eggs in the cage by the time I got home. I've been getting about 15-16 eggs per day out of the coop now, much better than what I was getting.
The brown one is quite young and the other one is about two.
Out of the 15, 10 are fairly young and 5 are older. Here's one of the older ones.
Making themselves at home.
I drove down to Hope and met a guy there to get the chickens. If you've never seen Hell's Gate I snapped a picture of it.
Along the way there's a few tunnels one goes through. I wish they'd put a tunnel in at the Big Slide, sigh....
The pool is put away, the garden is overrun with weeds (but that's typical on any day), the coop is clean, and our deck is filled with wood... c'mon winter I'm ready for you now.
Monday, June 9, 2008
Make your WD Passport work with any USB DVD Player
When I first bought my Western Digital Passport drive I had all intentions of putting hundreds of movies on it and plugging it into my USB enabled DVD player that's hooked up to my TV. Unfortunately it didn't work :( The drive draws power through the USB cable, and the LG DVD player I have, doesn't supply enough. I thought that if I bought an external case with it's own power adapter, took the drive out of the Passport and put it in there, it might work. Nope didn't work either, it was still drawing power from the DVD player. Last night my brother said "All you need to do is find the pin in the USB cable that has power and disconnect it." Eureka!
As always you do this at your own risk and I will not be responsible for any damages to your drive, dvd player, or computer. Everything worked fine for me though.
If you'd rather see this at YouTube click here.
You'll need: A Western Digital USB Passport drive (or a drive that does not have it own power supply or does not work with your DVD player because of the power issue.)

The pins in the USB cable are:

Start out by cutting into the USB cable near the MINI end. Be careful not to cut any of the wires!! You'll see four wires inside (RED, BLACK, GREEN, WHITE) wrapped in aluminum foil and silver wires.

Carefully pry out the RED and BLACK wires and cut them. Strip the RED and BLACK wires coming from the MINI end.

IMPORTANT: You will be connecting the wires together but only the wires coming from the MINI end of the USB cable. Connect the RED from the power adapter to the RED in the USB cable. Connect the BLACK from the power adapter to the BLACK in the USB cable. Remember it's the wires from the MINI end you will be connecting. You might not have coloured wires in your adapter such as I found out when I made a second cord. In this picture I did not. I don't think it matters which wires you hook up but I'm no expert when it comes to electrical stuff so you might want to test the wires.

Bend back the RED and BLACK wires that are going to the large end of the USB cable that you did NOT strip and make sure they don't touch any other wires, including the aluminum foil or silver wires!! Use small pieces of black tape to keep them by themselves. Use electrical tape and tape the whole works together ensuring no wires are touching anything else.
All taped up and ready to use.

The Passport drive must be in FAT32 format for the DVD player to see it and have a bunch of movies on it. You should now be able to run your Passport in your USB enabled DVD player :)
What you've done is cut the power that runs from the DVD player through the USB cable to the drive. You are now using power from a 5v power adapter you have plugged in. I would think that this would also work if you don't have enough power in your computer to run a Passport. I searched all over the net for a solution to this, or even a cable to buy, but found nothing. WD does sell a "Y" cable but this wouldn't work for me. It has two USB ends to draw more power to run the drive... my DVD player doesn't have two USB connections and I'm sure most don't. I've tested this in an LG DVD player and a Pioneer DVD player and both work great.
************************
Thanks! June 10th, YouTube video featured on: GetUSB.info
As always you do this at your own risk and I will not be responsible for any damages to your drive, dvd player, or computer. Everything worked fine for me though.
If you'd rather see this at YouTube click here.
You'll need: A Western Digital USB Passport drive (or a drive that does not have it own power supply or does not work with your DVD player because of the power issue.)
A USB cable that plugs into the drive.

A 5v power adapter. The end won't matter because you'll be cutting it off but you have to be sure it's only 5v!! In the pictures I'm using one from an old D-Link USB hub. I ended up making two cords, the first one I used was a charger I had for an old LG cell phone, it had coloured wires inside, the USB hub did not.

The pins in the USB cable are:
Start out by cutting into the USB cable near the MINI end. Be careful not to cut any of the wires!! You'll see four wires inside (RED, BLACK, GREEN, WHITE) wrapped in aluminum foil and silver wires.
Carefully pry out the RED and BLACK wires and cut them. Strip the RED and BLACK wires coming from the MINI end.
Cut the plug off the 5v power adapter. There should be one RED and one BLACK wire, your's could be different. RED is power, BLACK is ground. I made a second cord and the wires were NOT coloured. I don't know if it makes a difference but I hooked them up and the Passport works fine. You might want to use a tester for this.

IMPORTANT: You will be connecting the wires together but only the wires coming from the MINI end of the USB cable. Connect the RED from the power adapter to the RED in the USB cable. Connect the BLACK from the power adapter to the BLACK in the USB cable. Remember it's the wires from the MINI end you will be connecting. You might not have coloured wires in your adapter such as I found out when I made a second cord. In this picture I did not. I don't think it matters which wires you hook up but I'm no expert when it comes to electrical stuff so you might want to test the wires.
Bend back the RED and BLACK wires that are going to the large end of the USB cable that you did NOT strip and make sure they don't touch any other wires, including the aluminum foil or silver wires!! Use small pieces of black tape to keep them by themselves. Use electrical tape and tape the whole works together ensuring no wires are touching anything else.
All taped up and ready to use.
The Passport drive must be in FAT32 format for the DVD player to see it and have a bunch of movies on it. You should now be able to run your Passport in your USB enabled DVD player :)
What you've done is cut the power that runs from the DVD player through the USB cable to the drive. You are now using power from a 5v power adapter you have plugged in. I would think that this would also work if you don't have enough power in your computer to run a Passport. I searched all over the net for a solution to this, or even a cable to buy, but found nothing. WD does sell a "Y" cable but this wouldn't work for me. It has two USB ends to draw more power to run the drive... my DVD player doesn't have two USB connections and I'm sure most don't. I've tested this in an LG DVD player and a Pioneer DVD player and both work great.
************************
Thanks! June 10th, YouTube video featured on: GetUSB.info
Saturday, April 12, 2008
Scheduled Publishing in Blogger!
 I've had a few emails about me mentioning scheduled publishing in Blogger. Yes, you can now set up a post and have it publish whenever you like, great feature! It's about time Blogger caught up to the other blog sites. The catch is you must be logged into Draft Blogger to do this, it won't work using the regular dashboard.
Rather than me write anymore about it, you can read the full story, and how to do it, here. While you're there be sure to check out some of the other features Draft Blogger is trying out.
PS I'm in bed, because if you notice the time it's 3:00 AM! What in tarnation are you doing up?
Saturday, April 5, 2008
What will they think of next? USB Pregnancy Stick!
Yesterday, as I read over this post from Slashgear, all I could think was "for heaven's sake!" But this morning, as I opened my desk drawer and spy two pregnancy sticks from when I carried Sydney and then Jevan, I thought this is actually kinda cool. For starters I could have tossed the sticks, (why on earth do I keep them in the first place?) because all the information would have been stored on my computer. Anyway if you are pregnant or know someone who thinks they are give this a try and let me know if it works, because there is no way in heck that I will ever be able to try one! Nope, nope, nope :) 
PS Apparently this was a late April Fool's joke, but I can see the potential! Ha, ha, ha!!!
PS Apparently this was a late April Fool's joke, but I can see the potential! Ha, ha, ha!!!
Tuesday, March 4, 2008
Upgrade Your Laptop, with a bonus
My daughter Dallas recently bought a laptop that came with dual SATA hard drives; a 120 GB and an 80 GB. Shortly after buying her laptop, she realized that she didn't have near the space she needed, so she purchased a 250 GB Western Digital Portable USB Passport. While surfing around Youtube I discovered you can take apart the USB Passport, remove a small board, and it becomes a SATA drive... follow the instructions to see what I did.

These are great little drives. You simply plug them in USB with the supplied cable and it's instantly recognized. Power is supplied via the USB so no separate cable is needed.

Long story short, I took apart the Passport, popped it into her new laptop replacing the small 80 GB secondary drive. She went from 200 GB to 370 GB of space, an increase of a whopping 170 GB!
What did I do with the 80 GB hard drive I removed from her laptop, you ask? I put it into the Passport so she still has a small portable USB drive. Why would a person do this? It's better to have a large amount of space available in the laptop than to pack around an external drive, and USB transfer rates are much slower than SATA. The nice thing is nothing is wasted, most people would toss the smaller drive into a drawer and forget about it. A big benefit is the cost of a 250 GB hard drive is pretty close, and sometimes a bit more, than the Passport, and it doesn't come with the USB/SATA converter board.
It's fairly simple and I've posted instructions.
BEFORE you do this make sure there are no operating system files on the drive you are replacing!!
If there are files, you can clone the drive BEFORE making the switch.
There's no screws but you'll need a screwdriver to pop apart the Passport. Run the screwdriver around the edge of the Passport "popping" the plastic clips that hold it together.

Inside you'll find the SATA drive.

There is foil wrapped around one end and also four rubber pads in each corner. Save the tinfoil and pads to put on the drive you will take out of the laptop.

Under the tinfoil you'll see a small board that converts the SATA to USB.

The board pulls straight out. The drive is now a regular SATA drive ready for the laptop.

Insert the larger drive into the laptop. Dallas' had a small case attached to the drive inside that I had to take off and put on the Passport drive, four small screws so that was pretty easy.
The Passport comes default as FAT32, you'll probably want to format it as NTFS. Please make sure you have transferred any files off the drive before formatting!!

Dallas went from this:

To this:

Remember to take the hard drive you removed from the laptop and:
Insert the SATA/USB board into the old drive, place the tinfoil on, and then the four small rubber pads.
Put the drive into the Passport case and snap together. You now have a small portable USB hard drive (much better than throwing it in a drawer).
Western Digital is now selling a larger 320 GB Passport for even more extra space, but even if you didn't have dual drives you could upgrade your single drive and still have a portable USB drive using your old hard drive.
My only question: Who was the person that was sitting around and thought to take apart the Passport in the first place?
Update: Use your old hard drive hooked up to your USB DVD player and watch movies on your TV! If it doesn't work when you plug it in check out my tutorial to easily make a cord so it will.
These are great little drives. You simply plug them in USB with the supplied cable and it's instantly recognized. Power is supplied via the USB so no separate cable is needed.
Long story short, I took apart the Passport, popped it into her new laptop replacing the small 80 GB secondary drive. She went from 200 GB to 370 GB of space, an increase of a whopping 170 GB!
What did I do with the 80 GB hard drive I removed from her laptop, you ask? I put it into the Passport so she still has a small portable USB drive. Why would a person do this? It's better to have a large amount of space available in the laptop than to pack around an external drive, and USB transfer rates are much slower than SATA. The nice thing is nothing is wasted, most people would toss the smaller drive into a drawer and forget about it. A big benefit is the cost of a 250 GB hard drive is pretty close, and sometimes a bit more, than the Passport, and it doesn't come with the USB/SATA converter board.
It's fairly simple and I've posted instructions.
BEFORE you do this make sure there are no operating system files on the drive you are replacing!!
If there are files, you can clone the drive BEFORE making the switch.
There's no screws but you'll need a screwdriver to pop apart the Passport. Run the screwdriver around the edge of the Passport "popping" the plastic clips that hold it together.
Inside you'll find the SATA drive.
There is foil wrapped around one end and also four rubber pads in each corner. Save the tinfoil and pads to put on the drive you will take out of the laptop.
Under the tinfoil you'll see a small board that converts the SATA to USB.
The board pulls straight out. The drive is now a regular SATA drive ready for the laptop.
Insert the larger drive into the laptop. Dallas' had a small case attached to the drive inside that I had to take off and put on the Passport drive, four small screws so that was pretty easy.
The Passport comes default as FAT32, you'll probably want to format it as NTFS. Please make sure you have transferred any files off the drive before formatting!!
Dallas went from this:
To this:
Put the drive into the Passport case and snap together. You now have a small portable USB hard drive (much better than throwing it in a drawer).
Western Digital is now selling a larger 320 GB Passport for even more extra space, but even if you didn't have dual drives you could upgrade your single drive and still have a portable USB drive using your old hard drive.
My only question: Who was the person that was sitting around and thought to take apart the Passport in the first place?
Update: Use your old hard drive hooked up to your USB DVD player and watch movies on your TV! If it doesn't work when you plug it in check out my tutorial to easily make a cord so it will.
Tuesday, February 26, 2008
Brain Surgery would be easier
I consider myself somewhat "technical." I can rip a computer apart (and put it back together), install just about any program, and I'm on more people's speed dial for computer assistance than I care to imagine, but for the life of me whoever came up with iTunes must be a far, far, faaaaaar more advanced human than anyone on this earth! For over a year I was a DJ, tech support, and Treasurer for our local radio station. I dealt with mixers, several computers, created station ID ads and songs, Winamp was what everyone wanted to use, I preferred MusicMatch, and both were very easy to learn, but this iTunes makes me cringe every time it automatically opens.
If you all remember I bought Sydney an iPod for her birthday coming up in June (no I haven't given it to her yet) but I want to know the thing a bit before I give it to her so I've been "playing" with it. I thought I would throw some upbeat tunes on and run on my treadmill. I downloaded iTunes, plugged in the iPod and everything was okay.... then about a week ago I formatted my computer and reinstalled iTunes. Today I plugged in the iPod and promptly deleted everything on it! I think it's time I started looking for a few tutorials online because I'm scared I'm going to wipe out my whole music collection. I have over 5000 songs! Can anyone tell me if I delete a song in iTunes will it really, for sure, honestly, stay in my computer, and just leave iTunes? iTunes is really just the "link" to my song files, right? I keep bouncing back and forth between iTunes and my music folder just to make sure the songs are still there but I just want confirmation from someone who really knows the program.
And while I'm asking experts, how do I just pick and choose a few songs to go in the iPod and not my whole collection? Do you know how long it took to "sync" over 5000 songs?! The whole time I'm looking at the big red X telling me "DO NOT DISCONNECT" wishing I could stop the thing with cold hard stares because I don't dare touch it! And not only the songs it synced but all my long forgotten radio station ads, station id songs, Sydney's kid songs (like I really want to hear "Little Bunny Foo Foo" while I'm running on my treadmill) and my complete Christmas collection! I'm throwing my hands in the hair (most likely they will land on my head and pull my hair out!). Whatever happened to the good old drag & drop songs on the little mp3 icon in windows explorer? Now we have a "library" with playlists, party shuffle, podcasts, etc.
Does anyone have a link to some great site for (oh Lord I never thought I would say this about myself) a newbie with an iPod?
Wednesday, February 20, 2008
Computer Mama
Let's face it, we all want to be "perfect" mothers, and spend our leisurely hours sitting at the kitchen table tutoring our kids until they are geniuses... unfortunately life sometimes gets in the way... read on!
Last Saturday Hubby flew out to a camp job quite a distance away. He's up in the Queen Charlotte's and will be gone sometime between 2 to 4 months. I'm feeling a bit stressed because not only do I have all my jobs to do, but his as well. Although things will eventually fall into a routine, tonight was a bit hectic. Take water out and lock up the chickens, fill the wheelbarrow with wood and load the stove, get supper done, then the dishes, etc., etc., etc., ... all about the same time Sydney is asking me to please read out her spelling words. Arrrrrgh! In the time it would take me to read her spelling list I could have a bunch of this stuff done, and not only that but she will ask me again tomorrow night, and then the next, and then the next after that. What's a Mama to do? I grab my headset, bring up "sound recorder" on the laptop, hit record, and quickly read out her spelling words. I teach her to hit pause using the space bar, write out the word, and then hit the space bar again to resume. Wala, I'm in two places at the same time. She can simply click on the file and play it anytime this week... Ain't technology grand? :)
Thursday, January 24, 2008
Western Digital My Book Studio Edition
WARNING: Technical Post
If you own this external harddrive or any external harddrive and you do not want it to go into standby/sleep mode continue reading. If you don't own an external harddrive then skip this post. The reason I'm posting these instructions to my blog is because there's not much on the web for this type of problem, or this drive, and we all know how frustrating that can be. Use this fix at your own risk!! I have this script running on Windows Vista. The Western Digital My Book Studio Edition is sold as a MAC drive but you can format it and install it on any windows PC.
First off, if you don't already own this particular drive I would suggest NOT buying it. If you do already own it then you probably know that it has a bug so that when it spins down it simply will not wake up, making it fairly useless for backup jobs, or anytime you want to access it quickly. I have to hold the power button for about four seconds to shut it down, wait a few seconds, and then turn it back on again. Windows goes through the "auto play" feature and I'm able to see it again. Pain in the butt! I only have to do this if it's gone into a deep sleep, if it's only a semi sleep then it will still be recognized but it takes quite a few seconds before you can access it and sometimes it will just hang and you are then forced to do the power off/on thing.
I've checked many forums and it doesn't seem to matter if you are running this drive with a MAC or Windows PC. It also doesn't matter if you have it hooked up eSata, Firewire, or USB. It's obvious Western Digital needs to send out a firmware update but they are not saying/doing anything (even though they are well aware of the problem).
Below I have shown you how to create a script to keep the drive awake or you can simply download the script from here. After downloading and saving it, you must place it on the drive you want to keep awake, you then create a shortcut to the script and place the shortcut in your windows startup folder so the script will run automatically when you start your computer. If you don't restart right away, remember to double click the script to run it!
If you want to create the script yourself continue reading below. This probably isn't the best fix but it certainly helps, hopefully Western Digital will get their butts in gear and get a firmware update out there!
How to Create the Script:
Create a folder on the drive that you want to keep awake. In my case this is Drive G, yours may be different. I have my drive partitioned into three but only need the script on one partition. Name this folder whatever you like.
Inside the folder create a new text document and name it: script You will have to have your extensions showing so you should have a text document named: script.txt when you're done.
Open script.txt and copy and paste the words below into the text document. Anything between ***** doesn't matter but it's good to keep it with the script so you know what it is.
'***********************************************************
' The purpose of this script is to keep external hard
' drives awake which would otherwise turn off after their
' 5 minute timers detect no disk activity.
' To use, simply place this script on the hard disk
' you want to keep awake, e.g. in a sub folder.
' Double-Click to run the script, there is no GUI.
' A file will appear that has the same name as the script
' with the extension "-timestamp.txt" appended.
' This script writes to this text file every 4 minutes
' Simply create a shortcut to this script in your
' startup folder so that it runs everytime your PC boots.
' Advanced technically minded users have proven good
' results can be achieved with SrvAny.exe and InstSrv.exe
' from the Microsoft Resource Kit, to create this as
' a service.
' This script is in the Public Domain 2006
'***********************************************************
Const ForWriting = 2
Dim fso, f
Set fso = CreateObject("Scripting.FileSystemObject")
Function WriteToFile
Set f = fso.OpenTextFile( Wscript.ScriptFullName & "-timestamp.txt", ForWriting, True)
f.Write Now
f.Close
End Function
Do
WriteToFile
Wscript.Sleep (240000)
Loop
Save the text document and then close it. Right click the document and change the last three extension letters from .txt to .vbs It should now be: script.vbs Double click the script and you should see another file show up in the same folder with the name script.vbs-timestamp.txt If you see that file then you know the script is working.
IMPORTANT: Create a shortcut to the script and place the shortcut in your windows startup folder so the script will run automatically when you start your computer. That's it you're done! You now have a very small script running and this should keep the sleepy harddrive awake.
Update: Do you have a Western Digital Passport drive? Check out my tutorial for what you can do with it!
If you own this external harddrive or any external harddrive and you do not want it to go into standby/sleep mode continue reading. If you don't own an external harddrive then skip this post. The reason I'm posting these instructions to my blog is because there's not much on the web for this type of problem, or this drive, and we all know how frustrating that can be. Use this fix at your own risk!! I have this script running on Windows Vista. The Western Digital My Book Studio Edition is sold as a MAC drive but you can format it and install it on any windows PC.
First off, if you don't already own this particular drive I would suggest NOT buying it. If you do already own it then you probably know that it has a bug so that when it spins down it simply will not wake up, making it fairly useless for backup jobs, or anytime you want to access it quickly. I have to hold the power button for about four seconds to shut it down, wait a few seconds, and then turn it back on again. Windows goes through the "auto play" feature and I'm able to see it again. Pain in the butt! I only have to do this if it's gone into a deep sleep, if it's only a semi sleep then it will still be recognized but it takes quite a few seconds before you can access it and sometimes it will just hang and you are then forced to do the power off/on thing.
I've checked many forums and it doesn't seem to matter if you are running this drive with a MAC or Windows PC. It also doesn't matter if you have it hooked up eSata, Firewire, or USB. It's obvious Western Digital needs to send out a firmware update but they are not saying/doing anything (even though they are well aware of the problem).
Below I have shown you how to create a script to keep the drive awake or you can simply download the script from here. After downloading and saving it, you must place it on the drive you want to keep awake, you then create a shortcut to the script and place the shortcut in your windows startup folder so the script will run automatically when you start your computer. If you don't restart right away, remember to double click the script to run it!
If you want to create the script yourself continue reading below. This probably isn't the best fix but it certainly helps, hopefully Western Digital will get their butts in gear and get a firmware update out there!
How to Create the Script:
Create a folder on the drive that you want to keep awake. In my case this is Drive G, yours may be different. I have my drive partitioned into three but only need the script on one partition. Name this folder whatever you like.
Inside the folder create a new text document and name it: script You will have to have your extensions showing so you should have a text document named: script.txt when you're done.
Open script.txt and copy and paste the words below into the text document. Anything between ***** doesn't matter but it's good to keep it with the script so you know what it is.
'***********************************************************
' The purpose of this script is to keep external hard
' drives awake which would otherwise turn off after their
' 5 minute timers detect no disk activity.
' To use, simply place this script on the hard disk
' you want to keep awake, e.g. in a sub folder.
' Double-Click to run the script, there is no GUI.
' A file will appear that has the same name as the script
' with the extension "-timestamp.txt" appended.
' This script writes to this text file every 4 minutes
' Simply create a shortcut to this script in your
' startup folder so that it runs everytime your PC boots.
' Advanced technically minded users have proven good
' results can be achieved with SrvAny.exe and InstSrv.exe
' from the Microsoft Resource Kit, to create this as
' a service.
' This script is in the Public Domain 2006
'***********************************************************
Const ForWriting = 2
Dim fso, f
Set fso = CreateObject("Scripting.FileSystemObject")
Function WriteToFile
Set f = fso.OpenTextFile( Wscript.ScriptFullName & "-timestamp.txt", ForWriting, True)
f.Write Now
f.Close
End Function
Do
WriteToFile
Wscript.Sleep (240000)
Loop
Save the text document and then close it. Right click the document and change the last three extension letters from .txt to .vbs It should now be: script.vbs Double click the script and you should see another file show up in the same folder with the name script.vbs-timestamp.txt If you see that file then you know the script is working.
IMPORTANT: Create a shortcut to the script and place the shortcut in your windows startup folder so the script will run automatically when you start your computer. That's it you're done! You now have a very small script running and this should keep the sleepy harddrive awake.
Update: Do you have a Western Digital Passport drive? Check out my tutorial for what you can do with it!
Subscribe to:
Posts (Atom)