Tuesday, December 29, 2009

No hotdog buns? No problem, we have marshmallows!

I swore I had a package of hotdog buns in the freezer but when I went to look for them, they were gone, and I have a sneaky suspicion Jevan is the culprit.  On Christmas Eve I had just baked seven loaves of bread, but bread is just not right with wieners, although Hubby feels different, but who’s the boss? :)  So we had a bonfire with no hotdogs because I’m sure marshmallows are in the food group somewhere. ;)

Sydney with sticky marshmallow all over her lips.

Bonfire-015

A few months ago Hubby piled a bunch of wood up near the top of the driveway.  It’s either rotten, too gnarly, or too big for the woodstove when we have so much other wood available, so we saved it for a big burn.

Bonfire-009

The sun was shining and, for the end of December, the weather wasn’t bad.  Jevan circled the fire more times than I can count, it’s a boy thing, ‘cause Sydney was quite content to stick to one side.

Bonfire-027

Teddy enjoys the heat!

Bonfire-029a

Normally I wouldn’t put this picture up, but do you see that little bit of dark on the top left corner?  Yeah that’s my mitt trying to cover up the glaring sun because I’m missing the rubber eye piece frame on my camera… and we all know what happened to that now don’t we? …growl…

Bonfire-034

The fire is starting to throw a lot of heat and Jevan is keeping his distance.

Bonfire-035

The flames dance and flicker while bits of burnt wood start raining around us.

Bonfire-048

The kids and I head over to where Hubby has piled up the stumps, it’s much cooler over there.

Bonfire-061

It’s gonna be a bit before this fire is out.

Bonfire-081

****************************************************

Sunday, December 27, 2009

Never again

I say it every time, yup, every single time!  You would think after 16 years (it’s our anniversary today) of being married to my Hubby I would know better but he got me again this year!!

I am standing off to the side with my hands shaking, camera & lens filled with snow, freezing body, out of breath, hair turned white, and have even lost the rubber frame off my eye piece!!  Why oh why do I let him talk me into getting on the back with him?

You would think having my camera slung over my shoulder he would keep it reasonable but nope.  Instantly I’m trying to get the camera into my coat, it’s banging on my leg, filling up with snow and ice, my hat goes flying off… I’m gripped onto Hubby so tight my fingers are starting to hurt… all I can think is “oh joy this is fun” and I don’t mean that in a nice way!  At the first sign of stopping I’m flying off the beast of the machine, gripping the ground like I haven’t touched it in a year, throwing curse words out like one throws garbage off the back porch!  Twenty-four hours later every time I reach for my coffee cup my arms ache… I will remember this!

Skidoo-014

The man does not know the word: SLOW!  It’s flat out, screaming across the field… not only the snowmobile but also me screaming “STOP, I WANT OFF!”  My life is quickly flashing before my eyes and he calmly informs me that we are going 70 miles per hour, who in their right mind goes 70 on a snowmobile??  Only a man who runs a skidder for “fun.”

Skidoo-025

Well there’s one person who enjoys it…

Skidoo-001

I walked most of the route we took looking for my missing rubber frame eyepiece and had no luck finding it… Hubby bought me a new one online and said it was worth it to hear me scream.  MEN!!

********************************************

Tuesday, December 22, 2009

3 Ingredients & a Microwave = Fudge Heaven

I was watching the news last night when a small blurb about making homemade fudge came on.  Actually I wasn’t paying close attention when Jevan hollered “LOOK AT THAT MAMA!!”

I quickly grabbed the remote and jumped back to the start of the clip.  He was ooooooohhhhing and awwwwwwing about some fudge the woman was making.  It sure looked good, and simple to make… in the microwave… in about 10 minutes!  I was all over it. :)

Fudge 007

Brown Sugar Fudge

1 cup butter
2 cups brown sugar (tightly packed)
1 can sweetened condensed milk (I used Low-fat Eagle Brand)

Put everything in a glass bowl.  To start I didn’t even mix anything.  Place in the microwave for 10 minutes, only then stopping about every 2 minutes to mix.
Put tinfoil in a 8x8 pan with it overhanging the sides.  I sprayed it with a bit of Pam (no cook spray).  I don’t like rounded corners in pans so I used a square Tupperware plastic freezer container I have.  An easy way to get the tinfoil to fit is to place the tinfoil on the outside of the container squishing it to form all around.  Then pop it off and put it inside the container.
After ten minutes in the microwave, let mixture slightly cool.  Beat with electric beater for 5 minutes.
Pour into your 8x8 pan.  Let cool in the fridge for about 3 hours.

How easy is that??  And it is so good!  You can line the bottom of the pan with nuts or place a nut on the top, or sprinkle with broken candy canes, etc.

I also made the window slider box that the fudge is in, with the dividers it nicely holds four pieces perfectly.  If you have Cricut Design Studio you can get the file here.

**************************************************

Sunday, December 20, 2009

Sledding, Dogs, & Horses

We finally had enough snow so the kids could do some sledding.  The two of them head over to the hill near the graveyard.

Sledding 015

Coat wide open, he lost his scarf halfway over (we found it in the field), and I see he’s wearing Sydney’s heart hat but does he care?  Not at all… and Jevan takes off down the hill!

Sledding 027

Who cares if his ears are beet red because of the cold, he’s having a blast!

Sledding 029

Sydney’s turn.  Do you ever notice the older the kids, the more bundled up they are?  I’m wearing Hubby’s long johns under my pants, two shirts, two pairs of socks, a hat, and fingerless flip over mitts… brrrrr!

Sledding 059

Away she goes!

I walk up the hill and for the first time I see Bert’s headstone in the graveyard… it’s been almost a year since our neighbour Bert passed.  Bert’s dog Doolittle, who’s lived with us since Bert’s passing, runs joyfully alongside the kids and I give thanks for that. :)

Sledding 086

Sydney stops for a quick break to catch her breath.

Sledding 092

Of course all the dogs are with us, here’s a shot of Teddy, he’s probably wondering when we’re heading back to the woodstove?

Sledding 097

Little Joe and Woody (my fav horse on the whole ranch) stop and watch for a bit.

Sledding 133

Some of the horses are more interested in eating than watching.

Sledding 137

Saturday, December 19, 2009

Fast Microwave Peanut Brittle Recipe

I blogged about this a couple of years ago but thought some people may not have seen it so I’m posting it again for this year.  Yes, you really can make excellent peanut brittle in the microwave and it takes less than 15 minutes from start to finish!

Peanut Brittle 023

I found the original recipe here but because I have an 1100 watt microwave I had to make adjustments and it now comes out perfect every time.

Spray a 1/2 cup measuring cup with a touch of Pam (no cook spray), fill with light corn syrup and pour into a glass bowl.  I use my 8 cup glass measuring cup to make the recipe because this gets HOT!  Do not use a plastic bowl!!

Add 1 cup of white sugar.  Stir, this will be thick.

Microwave for 3 minutes.

Stir in 1 cup of peanuts.  Any kind will do, I’ve used dry roasted, unsalted, salted, doesn’t seem to make much difference.  Substitute the peanuts for any other nut if you like.

Microwave for 3 minutes.  In the meantime grab a cookie sheet, line it with tinfoil, and spray a bit of Pam on it.

Stir.  Add 1 teaspoon of butter and 1 teaspoon of vanilla (I use white vanilla thanks to Barbara but dark will be fine).

Microwave for 1 minute.

Sprinkle 1 teaspoon of Baking SODA over mixture.  Gently stir and everything will start to foam, keep stirring until it’s all mixed.

Pour onto cookie sheet.  Best have a spatula handy ‘cause this sets up quick!  I like to clunk the cookie sheet a few times to get out the air bubbles.

Let it cool, snap into pieces, and package up for a yummy Christmas present :)

************************************************

Friday, December 18, 2009

Lytton Elementary School Concert

Yesterday was the annual LES school concert and the students did not disappoint!  Grade 4/5 teacher Mr. White, worked tirelessly on props, music, makeup, and gathering the students for one rehearsal after another.

Sydney played the starring role of Ebenezer Scrooge in “A Christmas Carol.”  I had a hard time recognizing her when I ran into them waiting in the hallway.

CJ (Demon), Sydney (Ebenezer Scrooge), and Jasmine (Jacob Marley).

Christmas Concert 2009 004

A few shots of the play.

Ebenezer with the Ghost of Christmas Past (Amber).

Christmas Concert 2009 026

“The Crachit Family.”  They did a wonderful performance of “Silent Night” that you can see in the video at the end of this post.

Christmas Concert 2009 029

Christmas Concert 2009 012

Kayla (Belle), Jasmine (Jacob Marley), Sydney (Ebenezer Scrooge), and Robyn (Martha) after the play.

Christmas Concert 2009 036

Martina (Tiny Tim), Keauna (Mrs. Crachit), and Sydney (Scrooge).  Mr. White did an excellent job of putting on Sydney’s nose. :)

Christmas Concert 2009 043

Jevan’s class sang “I want a Hippopotamus for Christmas” but setting up one’s camera in the pitch black took me longer than I thought, so unfortunately no video of that.  In this picture he’s holding the letter “S.”

Hippopotamus for Christmas (by KansasA)

Here’s a few scenes from the play compiled into a video.  If you are unable to view it at my blog please click here to view it at YouTube.

For more pictures please visit my Flickr site. http://www.flickr.com/photos/kansasa/

******************************************************************

Tuesday, December 15, 2009

Gingerbread Day

This morning I was out the door by quarter past nine.  I gave myself 45 minutes to get to my dentist appointment in Lytton and, because of the roads, I still arrived about five minutes late!  Slip and slide was the chant of my morning no matter how slow I went… I’m beginning to dread winter and this is the first time this year I’ve driven in the snow.

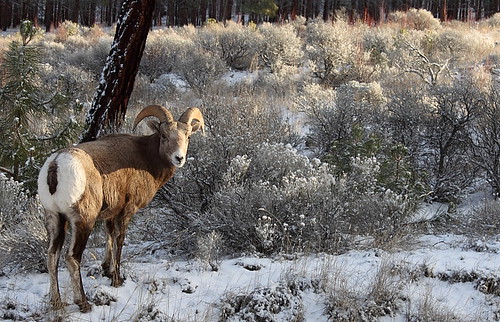
Pulling out of the driveway I ran right into a herd of sheep grazing on the highway.  The sun was glaring and this guy (or gal) was one of the last ones to cross the highway.  I had only brought my 18-55 mm lens so no really good close-ups and really I should know better by now… sigh.

Pulling out of the driveway (by KansasA)

There must’ve been about 20 of them in total and they will all stand there carrying about their business as long as you stay in your vehicle.  I learned that lesson the hard way.

Morning Sun on the Sheep

After over an hour in the dentist chair, face frozen like the weather outside, I head to the grocery store, I had to blow quite a bit of time before Jevan’s class started their “Gingerbread Day.”  I would have driven home but, by that time, I would have had to turn around and drive back again.

A quick stop at the bank and I head over to the school, about 45 minutes early, probably a first for me :)  I scooted upstairs to nab Sydney so she could show me the stage Mr. White has been working on for the school play.  Sydney is starring as Ebenezer Scrooge in “A Christmas Carol.”  Thursday at 1:00 if any of you are around Lytton at that time :)

Props for the play (by KansasA)

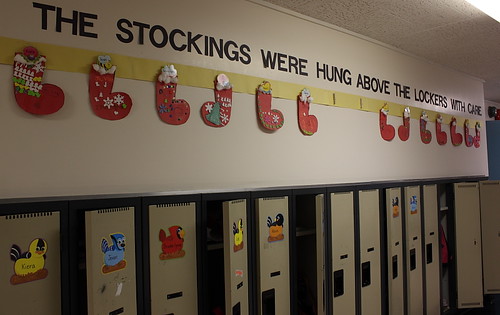
It was lunchtime at the school so I helped Jevan into his coat and mitts and he headed out the door.  Miss Veenstra has decorated up the hallway with stockings the kids have made.

Gingerbread Day

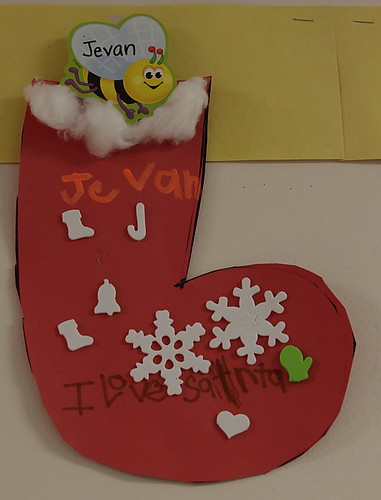
I spot Jevan’s stocking and chuckle seeing his corrected spelling mistake :)

Jevan's Stocking

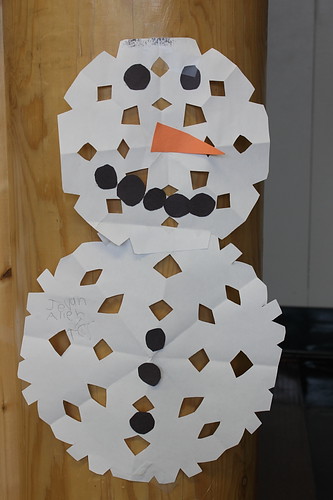
Sydney and I wandered around and I see, near the entrance of the school, Jevan has made a cute snowman.

Gingerbread Day

It’s time for the Gingerbread party to start.  First thing we make is a gingerbread house with graham crackers. 

Gingerbread Day 2009 (by KansasA)

Even tho’ Jevan was constantly licking his fingers and eating the candy we still make a pretty good house ;)

Gingerbread Day 2009 (by KansasA)

The next picture is not only to show you our next craft of the snowflake but that Jevan really needs a haircut!  It looks as if he has a pom pom stuck on his head but in fact it’s hair… standing straight up!  Oh Lord I’m embarrassed!  If I shave his head, which is what I usually do, in this weather he’s gonna freeze his ears off…. I just might have to do something creative this time… I wish I could stick his head in the Cricut :)

Gingerbread Day 2009 (by KansasA)

After snacks and hot chocolate I feel the freezing has left my face, only to be replaced with that “you’ve had your mouth open for over an hour and numerous needles” pain setting in.  I tell Jevan it’s time we go, the two of us head for the truck and wait for Sydney to show up.  I walk in the door at 3:30 and let Hubby and the kids pack the groceries in :)

Tomorrow is another trip to Kamloops and then Thursday is the kid’s Christmas concert and play so another trip to Lytton… but Friday everything is over…. YAAAAAAAYYYY!

For a ton more pictures of the Gingerbread Party head to my Flickr site: http://www.flickr.com/photos/kansasa/

*********************************************************

Saturday, December 12, 2009

Christmas Mug Pouch

Okay I “scraplifted” this from another site, the The Frugal Crafter, and I have to say she has some excellent stuff over there! :)  Yup I’m learning the lingo as I carry on with my Cricut. LOL  I actually just grabbed the freely available .svg file and then sized it, cut it, and decorated it to my liking.
Cricut Mug for Xmas
When I get to the grocery store I’ll pick up some cinnamon sticks to stick in with the apple cider.  I’m thinking of getting some hot chocolate pouches and maybe a candy cane too.
I’ve uploaded the scut file (works with Sure Cuts A Lot Version 2 or SCAL for short) here.  Two mugs will be cut on one sheet of 12x12 paper.
This design cuts as one piece but I found it not quite sturdy enough and I also didn’t like the back of the Christmas tree paper, so I “flipped” the design and cut another set to paste together.  If you only want to make one mug then flip the bottom one on the scut file before cutting, or delete it if you want to use different paper.  I then used the Cuttlebug to emboss the back and handle.  Fold the front over and glue.  I tied a ribbon onto the handle and I also glued ribbons on other ones I made.
I like this design for not only Christmas, but “Tea for Two” with two teabags inside, or if someone has a cold/flu a pouch of Neo Citron with “Get Well Soon” or a “Cup a Soup” pouch… the ideas are endless! :)

Friday, December 11, 2009

Simple & Quick Santa Ornaments

Last night I created a four page SCAL (Sure Cuts a Lot) file to make it really simple and quick to cut out Santa Ornaments, you’ll do four at a time!  Today I cut everything out and put them together.
Santa Christmas Ornaments
I didn't have the cartridges from Provocraft so I had to improvise in SCAL :)
Download the file by clicking here.  I created it using SCAL Version 2.0.
Supplies:
White glitter paper (I used one 12x12 sheet from Martha Stewart’s Holidays Multimedia Pad to make eight Santa Ornaments) Cut using MAX pressure!
Red paper for hat and nose
Cream paper for face
4 background circles 4 inches
4 smaller circles 3.5 inches  (Can be all the same or mix and match)
Glue/adhesive
Pink ink for cheeks (I used a small make-up sponge and mixed red and white together)
Black fine tip marker for eyes
Pop up dots
Ribbon
Cut everything out.  You’ll do four at a time.  Run the 4 inch background circles through the Cuttlebug.  Glue the cream face behind the Santa beard with the top sticking above.  Glue the white band and pompom to the hat.  Glue the red nose to the moustache.  Set all that aside to dry.
Cut your ribbon, about 5-6 inches.  Glue to background circle.  Glue the smaller circle so the ribbon is sandwiched between.
Apply pinkish cheeks to Santa’s face.  Glue all the parts from Santa together.  When applying the moustache I glued only the nose so the ends of the moustache would stick up a bit.  Use a fine tip black marker to make Santa’s eyes.  Apply two pop up dots to the back of the Santa and place on the circles.
Santa Christmas Ornament
At first I was using a punch to create a hole in the top before gluing the ribbon in behind.
Santa Christmas Ornament
The pop up dots made Santa stand out.
Santa Christmas Ornament

Thanks to Shari over at Flickr for the idea!

Thursday, December 10, 2009

Cricut Cards & Looming Xmas Gifts

I’ve finally figured out where the Cricut cuts and it’s opened a whole new world for me ;)  And having SCAL (Sure Cuts A Lot program) helps too. 

Here’s a few Christmas cards as well as Pop’s birthday card, he turns 69 tomorrow.  We are heading over there for a fondue dinner but I think we’ll all snack before we go because don’t ya find yourself hungry after doing fondue?  My idea of a fondue is to use the basket from my deep fryer, those piddly little forks with teeny chunks of meat just don’t feed my logger :)

The tree on the first card was a svg file from Free Svg’s blog.  I guess I’m an “earthy” kind a gal ‘cause I really like the colours… it’s about time eh?  Maybe I can figure out this colour coordination thing after all, I was beginning to think a person has to be born with the skill ;)  The other two Christmas cards were placed in the Cricut so the design on the paper was in the right spot, then some embellishments added to compliment.

 Christmas-Cards-Gifts-009[8]

I dug out my looms and, boy oh boy, were they dusty!  It’s been awhile since I’ve loomed but I find it’s like riding a bike; you don’t forget much.  I whipped up two hats in short order, the blue one using Isela’s small gauge loom and the white one using the green round loom from Knifty Knitters.  While digging for wool I found a scarf that I started on needles last year, and only needed to bind it off, so it’s been added to this year’s Christmas collection too.

Christmas-Cards-Gifts-012

Friday, December 4, 2009

Love Hate with the Cricut

I’m liking this Windows Live writer, it’s making me post more :)  … the card making with my new Cricut?… not so much.  I know for next year to start my cards in January because I spend waaaay too much time on a single card.  I’ve come to conclude there is no such thing as “quick and simple” when paper, glue, and scissors are involved.  Did I just say that?  Jevan has been learning paper, glue, and scissors for the last two years in school and me, at my age, is cursing it!  Maybe I should pop into his kindergarten/grade 1 class for a few hours?  I promise to leave my pointy scissors at home :)

Sydney, on the other hand, is loving the Cricut.  She will sit there for hours using all my specialty paper, my new glue adhesive, my new pop dots, etc., etc.  It got to the point when I had to tell her to start using scraps or I wasn’t going to have anything bigger than a 5x7 left!  Lately she’s been making mini paper dolls to take to school.  Really cute and fancy… okay she didn’t inherit those skills from me, but her Dad is really good with a chainsaw so maybe she got the creativeness from him?

I try, really I do, colour coordination is my downfall, but give me a sewing machine, or let me set up a computer for you, or asked me to make yorkshires, or, or… Anyhoo, here’s my latest creation, take your glasses off. ;)

Snowman Card 012

When I was in Kamloops I popped into Michaels (I really think they should rename it “Costco for Crafters” ‘cause ya go in for ONE thing and come out with a bundle!).  Along with my bundle I bought a couple of 6x12 inch mats for the Cricut.  Did you know that 6x12 inch mats don’t work in the Cricut Expression?  Well now you know.  Funny how, in all my research, I didn’t read that little tidbit of info anywhere, and believe me I’ve been to tons of sites!  I ended up cutting the ends off and using them sideways, seems to work, but only for small stuff.  I would have bought the 12x12 mats but for some reason I cannot find them in Michaels (twice I’ve looked and the sales person at the till was no help).  They have the 12x24’s but not even a space for the 12x12’s, I find it odd that they don’t sell them.  Wal-Mart has a space for them but of course they are long sold out :(

Wednesday, December 2, 2009

Another trip to Kamloops

As you’re reading this I’m on my way to Kamloops and I was just there one week ago.  I have to say the stores were great last week… no crowds, no line-ups at the till, lots of parking for my 4x4 long box truck (amazing!) but I have a feeling that’s not going to be the case today.  It’s Dec 2 and that, my friends, is just getting too darn close to Christmas.

The reason I went last week was because I had my eye on a new machine called a Cricut, made by Provocraft, a couple quick calls and I found out that Wal-Mart had them in stock, with a hundred dollar rollback, Michaels was 200 dollars more!.  This thing is pretty cool and if you’re crafty you can make a ton of things.  Okay the name of my blog is “Canadian Crafter” but I craft in different ways; knitting, looming, embroidering, etc.  As for making cards and such, I suck… big time.  My problem is I can follow a pattern but coming up with ideas on my own I find really tough.  I wish I could buy a bottle of “how to make cards and scrapbooks look pretty using your own ideas” because I swear some of the designs I’ve seen I wonder how on earth these people come up with them!

After making a few cards I have truly learned that when I see the humble little card in someone’s showcase I will gush and gosh over it as much as the elaborate ones because that card took as much thought, and time, as any other one.  I tried last night to make a card similar to one I saw at another blog… she quotes “This is a quick and simple design if you are wanting to make a quantity of holiday cards.”  Uh?… “quick and simple”? it just may be if you have creative juices flowing from your brain to your fingers because it took me about an hour and my card did not look like hers at all!  I’ve never before used some of the craft products that I bought when I was in Kamloops, but after getting sticky adhesive on the front of the card (look near the dot above the j) and then using my finger to try to remove it, leaving a dirt mark on the front that would not come off… well you get the picture… another card for a family member who wears thick glasses or perhaps needs glasses. ;)

But I will not give up, darn it!  Today I will buy baby wipes to keep beside my craft table and use them often.  Maybe I can find a full bottle of creative juices while I’m there too? ;)

Cricut Cards 010

Tuesday, December 1, 2009

Trying out Windows Live Writer

Jodi, over at MCP Actions, mentioned she was looking for something similar to Windows Live Writer for posting to her blog.  I remember trying it ages ago but I couldn’t upload my pictures way back when because of blogger issues, but now that I use Flickr I just might be able to.  I guess if/when you see this post it worked :)

So the first thing I have to see is if I can link a picture from Flickr.  I had to add a plug-in so now let’s see if this works.

Jevan reasoning with one of the pigs.

Pig Riding (by KansasA)

Well I’m not sure if it worked because I see a “This photo is currently unavailable.”  Copying the URL into a Firefox browser brings up the picture but I don’t know if I can trust that.  Manually adding the code seems to work fine (I can see the picture now) but I think this is not good for me because I would have to copy the code, insert it manually, and then it has to actually download into my computer for me to see it...  I’ll have to find a different plug-in :)  But if you have high-speed this would probably work great for you.

Another plug-in is Flickr Upload for Live Writer… this means if I use a picture from my own computer in a post it will upload to my Flickr account.  Here goes…  Okay that did not work.  The upload caused an error and closed the application.  Again this could be due to my slower satellite connection so I’ll try a smaller file size.

Day 1 Nov 27 2009 Science Fair 025

It worked!  I can see this plug-in will save lots of time but I need to reduce/resize my pics first :)  The above picture is the first day of Sydney’s science project.  She filled four jars with different solutions: Salt water, bleach, Coca Cola, and vegetable oil.  One rusty nail was placed in each jar… she then makes notes everyday about any changes that occur.  In a few months she’ll compile all the info and present it at the Science Fair.

Okay I’m off to play some more and see what other plug-ins work.  Hopefully you’ll see this post (fingers crossed).

Technorati Tags: ,,,